|
Duplicating |

|

|

|
|
Duplicating |
|
|
|
|
There are a number of simple procedures for establishing a row or a matrix of identical objects click by click from a particular object. To do this either requires an existing "origin object" to be copied once and this action repeated as often as required, or a sequential insert action can be repeated several times. |
The command Edit > Repeat: [Action] or Ctrl + r can be used in particular to repeat a copy action. In this way, you can successively – Ctrl + r by Ctrl + r – create a growing collection of equidistant clones of the origin object. (Explanation: The selection is transferred from the original to the copy in each case, because otherwise innumerable copies of the origin object would be duplicated on top of each other.) |
The command Edit > Repeat: [Action] or pressing Ctrl + r can also be used to repeat a sequential insert action if the coordinates of the latter were entered relative to the reference point of the first inserted object. In this way, you can also successively – Ctrl + r by Ctrl + r – create a growing collection of equidistant clones of the sequentially inserted object. |
To create a row of equidistant drilled holes (or a row of other identical objects), proceed step by step as follows:
|
A matrix of rectangular cutouts (or a matrix of other identical objects) is created by successively copying a previously created row of equidistant rectangular cutouts. To do this, first create a row of equidistant rectangular cutouts as previously described for the row of drilled holes. If you now select this series of rectangular cutouts, you can create a copy of this, and then by pressing Ctrl + r often enough you can build the required matrix. |
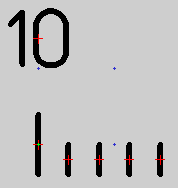
Even a scale with major and minor intervals as well as lettering can be relatively easily generated with the duplication command. First of all, create an interval mark for the major interval, between which the required number of interval marks is generated, the distance between them representing the minor interval, by copying and duplicating (see Example 1):
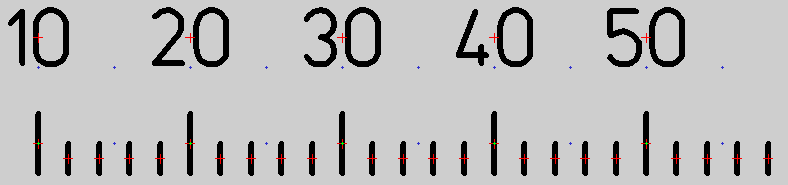
The text can be placed relative to the reference point of the first line engraving. If "Center"is selected for the alignment of the text then the reference points of the text and the line engraving are vertically aligned. In the above example, the four interval marks for the minor interval can either be scaled down later or the interval mark for the main interval can be scaled up later. Now, the entire ensemble can be duplicated:
After customizing the text for the text engravings, the linear scale is complete:
The procedure can be varied as needed, for example to label the minor intervals or to complete the last major interval with "60".
|