|
Text |

|

|

|
|
Text |
|
|
|
|
For labeling please first select Insert > Text Engraving and place the object. In the subsequent dialog box "Text engraving properties", you can then determine your desired properties. |
A text engraving is a single or multi-line character string to which certain typographic features can be assigned, which can then be turned into an engraving. The characters must however originate from an "engravable" font. |
After placing the object you can set the following variables for the required text engraving in the properties dialog box, while previewing the resulting engraving:
|
The reference point of a text engraving (red cross) is located by default – corresponding to left-aligned orientation – at half cap height on the vertical left boundary of the first letter of the first line of text.
With right alignment, the reference point is located at half cap height on the vertical right boundary of the last letter (of the first line of text). With centered alignment, the reference point is located at half cap height centrally between the vertical left boundary of the first letter and the vertical right boundary of the last letter (of any of the lines of text). The horizontal alignment of the reference point can be set separately: either on the centre line or on the base line of the capital letters (of the first line of text) |
While so-called "one-stroke" fonts generally consist of sans serif ("unadorned") characters, the characters of the so-called "multi-stroke" fonts most certainly have characteristics such as serifs. In order to achieve such characteristics, design the available milling or engraving lines so that they highlight certain characteristics by overlapping, whereby the lines must always overlap so far that no burrs remain at the end. For each multi-stroke font there is accordingly a certain text height (or X-scaling), above which a burr inevitably remains. (You can also see this in the preview, if you set the text height high enough with a multi-stroke font.) As long as a burr remains in the engraving, this cannot be satisfactorily in-filled with paint. To avoid this, you should always select a tool which excludes the formation of burrs with a high level of certainty when using multi-stroke fonts.
|
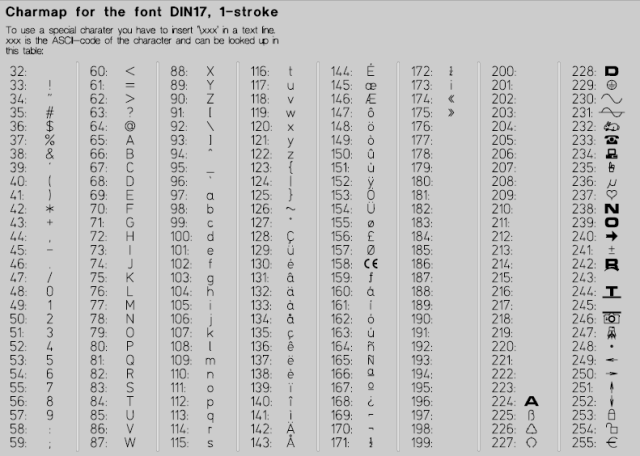
You can download a PDF file that lists all the characters (including special characters) which can be displayed in the fonts available in "Front Panel Designer" :
A special character can be replaced in the text by "\xxx" whereby "xxx" stands for the ASCII code of the character, which can for example be taken from the character map of the FPD file (see picture below). The following picture shows the relationship between the characters and ASCII Code for the DIN17 font:
For better illustration, you can download a ZIP file with lots of FPD files, each listing all the characters (including special characters) which can be displayed in the fonts available in "Front Panel Designer" : |
|
|